Monday 31 October 2016

Deathwatch Army: Kill team Formations (Part One)


Hello Mini Junkies

Here is a quick look at my first Kill Team of two for my Deathwatch Army. I went for a Melee heavy squad in this formation. I started with one of the 5-man Kill Team kits I have and added some extra units so it's now a 10-man team, a couple of units have jump packs and a couple are on bikes. I liked the idea on the bikes and jump packs using fast attacks to hinder enemy lines to give time to the rest of the squad move up and wade in at close combat. 

Choosing what weapons to give everyone took a long time, a very long time, that and deciding which chapters to use in each Kill Team. But after a lot of obsessing and sifting through not just the kit, but my bits boxes too, I finally finished on a team I'm happy with.


I have named all the units in this formation and the entire army for no other reason than I thought it would be a nice touch. As I tend to paint in sun-assemblies, the models below are mainly held together with blutac. Hence no shoulder pads

So without further ado, may I introduce Kill Team Lucius


Brother Sergeant Lucius of the Mentors with bolt gun & xenophase sword.
Made a small conversion by repositioning the sword arm. I didn't like how the original arm position looked, I felt it stuck out too much for overall pose of the model. I also used a bare head from the Centurion Space Marine kit

Brother Kayron of the Flesh Tearers with chain glaive.
Again made a small conversion to create the chain glaive by taking the heavy chainsword from the Legion MKIV Power Weapons Set from Forge World and splicing it onto the haft of a heavy thunder hammer.

Brother Tarsis of the Ultramarines with heavy thunder hammer.
Converted the Grey Knight backpack by adding a standard topper in my bits box. Really don't remember which kit it came from. Also used the chest piece from the Deathwatch upgrade sprue and the helmet from the Sternguard Veteran kit.


Brother Rothgar Lone Wolf of the Space Wolves with twin chainswords and his pet fenrisian wolf Heppin. 
This is a kit bash from lots of kits, mainly Space Wolf ones. While deciding on how to equip this model I came up with a back story for this one. 
Rothgar as his name indicates is the last member of his pack that was destroyed during the failed defence of a agri-world from a Tyranid invasion. He returned to Fenris after leaving the doomed planet just before the Ordos Xenos declared 'Exterminatus' on it. While roaming the ice plains of Fenris, deciding what his future held within his chapter, he came across a slaughtered pack or Fenrisian wolves. He could not tell what had made this kill but among the entrails he found one cub still alive. Seeing obvious similarities in fate of himself and the cub he took it back with him to The Rout. On arriving back at Space Wolf Fortress Monestary he found an Inquisitor waiting for him the same Inquisitor that ordered the death of the agri-world he lost his pack on. Rothgar was asked to join the Deathwatch, he accepted and has been in the Deathwatch with his pet and companion Heppin by his side ever since.
Heppin in Norse means 'lucky' by the way.

Brother Malik of the Black Templars with pair of lightning claws on jump pack.
The claws are also from the Legion MKIV Power Weapons Set and the jump pack is from the old Space Marine Assualt Squad kit.


Brother Claudius of the Hawk Lords with shotgun on jump pack.
The jump pack and helmet are from the Vaguard Veteran kit and the torso and legs are from the old Space Marine Assualt Squad kit.


Brother Corbin of the Crimson Fists with twin power fists on jump pack.
The head is from the Sternguard Veterans, the fists are from the Blood Angels Death Company and Space Marine Comander kits


Brother Izeya of the Dark Angels on bike with Corvus Hammer. This is entirely from the Ravenwing Command Squad kit apart from the head which is from the Sternguard Veterans kit.


Brother Jetek of the White Scars on bike with power sabre.
Straight from the Overkill boxed game.


The Other, Blackshield with power sword & shield.
Went a literal with this one and gave the Blackshield a sheild! All parts are from the Kill Team kit.


Part two will be focusing on the second kill team. Less stabby-stabby and more shooty-shooty!

'Till next time, May the painting gods be with you, always.

Old Mini Junky


Wednesday 19 October 2016

New Start, New Goals

Hello Mini Junkies,

It's been a really long time since I have written anything on this blog. In honesty the demands of my job have meant that keeping up with regular posts was never going to work out. But things have changed and I really would like to give blogging about the hobby that I love and quite frankly keeps me sane (well close enough to sane as I'm willing to get). 

I have been painting minis (solely Games Workshop miniatures thus far) for a while now, but probably like most of you, I have a massive pile of unopened boxes or part started projects that have not been finished for reasons rangeing from got distracted by something new and amazing being released to "crap! I forgot I even had those!". I can quite confidently say that do have a 'plastic crack addiction', and probably always will. 

So my goal is to work my way through my pile of old projects as well as some more recent ones too. My 40th birthday has just gone and I was give pretty much a whole Deathwatch army from my brother plus I treated my self to a few bits too which has added greatly to my to do pile. But this goal is not just to paint everything, I have decided that I'm going to start entering competitions as well, I think the best way any of us can push the limits of our skills is by competing with other painters and getting feedback on your work from judges and piers. Just knowing that my work is going to be judged will focus me into doing the best I can.


My top competition goals are to enter:

1. A Golden Deamon 
2. Armies on Parade
3. My local GW Store comps 
4. 'Ead Banger. This is run by a Facebook group called 'Eavier Metal.I am part of a number of Facebook groups but this one is the most inspirational group of the lot. There are some amazing painters in this group and you always get great feedback on your work. So if you haven't already go join this group.
(5. I am also going to see if I can get some of my work in White dwarf.)

Will I win anything? Maybe, but probably not. Will I be a better painter for having tried? I should think so.

As mentioned already I have a lot of Deathwatch minis to paint ( 2 kill teams, a Corvus Blackstar, a Watch Master and a Librarian) so this will form the biggest project of anything I do (lots of blogs too I hope). This will also be my entry for Armies on Parade next year. I have been looking online at this years entries and WOW! there are some amazing pieces, a lot to live up to. Having said that I'm really looking forward to getting stated on this, but I must say that I can tell how long I have been obsessing over what load outs to give all these minis. What chapters to use, how will have what weapon, what formations will I use, how much kit bashing/converting will I do and so on and so on!

But first I have this little chappie to finish off.


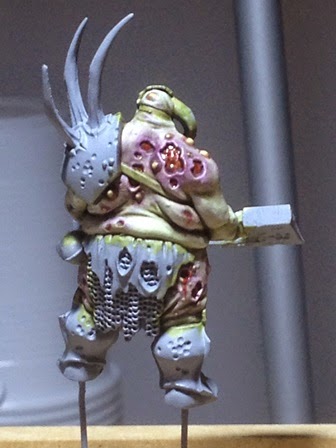
Not much left to do on this Nurgle Deamon Prince now, just the metallics and scenery details. Really enjoyed painting this mini so far, loads of details and techniques needed to get it to this stage.

'Till next time, May the painting gods be with you, always.

Old Mini Junky


Tuesday 16 August 2016

SHOWCASE - Deathskulls Deff Dread

Hello Mini Junkies

First post in a very long time and first model finished in quite a while too!

Really happy with this model, the rust effect on the blue armour took forever but I think it's paid off


Hope you like?


Thursday 23 April 2015

TUTORIAL: How I Paint Nurglings

Hey Folks, OMJ here.

As I mentioned in my last post, I wanted to show you how I painted my Nurgling for my Nurgle Chaos Lord display base. These are fun little models to paint and take no time at all, think maybe a hour to a hour and a half. I used GW paints for the whole process.

Step One: Basecoat.

I used Rakarth Flesh thined down 1:1 with Lahmian Medium (In fact I thinned all paints and washes used in this process with medium). It took at least three thin coats to get a nice flat surface before moving on to the next stage.

Now you can used any colur you want for the basecoat, depending on what colour you want your Nurglings to be. I didn't want to go green as my Chaos Lord is green so I went for a pasty looking colour instead. For the other Nurgling on the display i will be using Deamonette Hide as i want a more purple figure to contrast with this one and the green of the Lord.


Step Two: Washes

For this I used Ogryn Flesh from the GW old range, but your could also use Reikland Fleshshade. this was painted thinly over the entire model then left to dry. Actually I have pinched my girlfriends old hair dryer and use that to speed up the drying process. Once dry I reapplied the wash to the deepest recesses to further darken them. Did this one more after drying.


Step Three: Highlight.

With Pallid Wych Flesh I hit all the parts the light would hit (light source being from above) and left the shade to the undersides and recesses.

If you are using a different basecoat then you will need to use a complementing highlight colour too, I will be using Slaanesh Grey on the other Nurgling.


Step Four: Bruising

I want my Nurglings to look like they a all bruised and decaying, so to do this I first used thinned down Druchii Violet. I hit all the folds and deep recesses. As this is thinned down a had to do several applications to get the colour I wanted. Then I did the same with some Carroburg Crimson, this time I focused on the open sore, the boils and the deep recesses.


Step Five: Horn & Mouth.

For the mouth I hit it with some Agrax Earthshade, made sure it was nice and dark the let it dry. Once dry I painted the teeth with Screaming Skull.

For the Horn, I applied some Seraphim Sepia to the top three quarters in two or three layers, once dry I hit the top third with Agrax Earthshade. I also applied a little Earthshade around the base of the horn to shoe where it meets the skin.


Step Six: Tongue.

I basecoated the tongue in Pink Horror, then gave it a wash with Carroburg Crimson, then highlighted with Emperor's Children.


Step Seven: Finishing Touches.

The last bits were the boils, open wound, slime and eyes.

For the boils I based then in Zemesi Desert and highlighted them with Golden Yellow (from the old range). For the open wound I used a little Blood for the Blood God and for the slime I used Nurgle's Rot. The eyes were done by first using some Agrax Earthshade to dark the sockets, the used a tiny bit of Golden Yellow to bring out the eyes.


Done! Here is a quick pic of him on his mound.


Hope you like.....


Until next time.


Old Mini Junky

Tuesday 21 April 2015

Getting back my Mojo.....

Hey folks

Its OMJ here, trying to get more blogs done without big time gaps.

Late last year I was having a real hard time getting any painting done and when I did, I wasn't happy with my results. I had lost my painting Mojo!

Now I think I'm getting it back. been having a go at some NMM (that's Non Metallic Metal if you didn't know) and have finished another project.

But it was this Nurgle Chaos lord that really helped me get out of my funk.


I finished him in January but have not got round to basing him. I wanted to do a display base and started work on it a month or so ago but didn't get too far.
 

But today I have done a little more. I have added a couple of Nurglings and got the whole thing primed (I used Halford Grey Primer) and got the banner done and the Nurgling sitting on the mound.


Really happy with my progress on this so far and looking forward to getting it finished. I will have a tutorial soon on how I painted my Nurgling and will do a step by step on the rest of the base too. Just not sure when.

Hope you like.....

Until next time.

Old Mini Junky


Sunday 12 April 2015

SHOWCASE - Librarian in Centurion Armour

Hi all

It's been quite a while since I have posted anything. real life stuff has seemed to get in the way of the hobby I love.

But think I have finally started to get my Mojo back :)

Here is my first finished piece in months now and It feels good to have completed it. Its a conversion for a Flesh Tearers Chapter Librarian in Centurion Armour. I did post a few WIP picture on some Facebook groups that was met with mixed feelings. Most people liked the idea, but a few "poo-pooed" it mainly because it wasn't legal and didn't have any place in the game. As I don't play and only paint its not the end of the world and hey its my hobby surely I can do what he hell I want right? :)

Anyway, here are some picture, what do you think?


Friday 19 December 2014

I Have Lost My Mini Mojo...........

Its been quite a while now since I last posted anything. This is basically because of two things. Firstly, work! I own a restaurant and its been really busy for the last few months and it has sucked up most of my time. Secondly, I have lost my "Mini Mojo". Any time I have tried to pick up a paint brush to continue work on my Dreadknight, I just have not been able to get into it and le last thing I want to do is mess the model up. I have tried something different too,


I have done a kit bash to make up a squad of Flesh Tearer Assault Marines, but when it came to painting them I just wasn't happy with the result.


I am part of the Facebook community page called '40K for grown ups' and asked people on that what they have done to get out of their painting funk. the responses were varied but in the end they mostly said to try something completely different.


So a couple of weeks ago I started painting a Warhammer Fantasy model, the Nurgle Chaos Lord. Its a model I really like the look of and have used one before for a 40K conversion for my Inquisitorial Warband. I love all the detail and textures on the model and actually got excited about painting again for the first time in a while. I have almost finished all the flesh and am looking to get the armour done next.

Hopefully I can get back to my main project soon

Any Comments would be great
(Sorry for the quality of the picture, taken with my phone)